- network
- reactivity
As front-end developers, we call remote machines all day long. We fetch URLs, we get data from APIs, and we interact with various back-end services. We think in terms of resources. But what if we could think in terms of functions instead? Imagine that we call a function foo() on our local machine, and it runs on a remote one, as if the network did not exist. How can we orchestrate this process? This is something I discovered during my latest personal project and that I will explore in this article. Something that feels quite magical to me (again!).
The project before the theory
Before going further, let's take a look at my LED board project that led me to these remote function calls. An LED board is an  LED matrix panel that is quite compact and can be controlled by a microcomputer like a
 Raspberry Pi. We can write a script, running on the Raspberry Pi, to communicate with this board and give it instructions like "turn on the LED at position x:20 y:32 in blue". It can be illustrated like this:
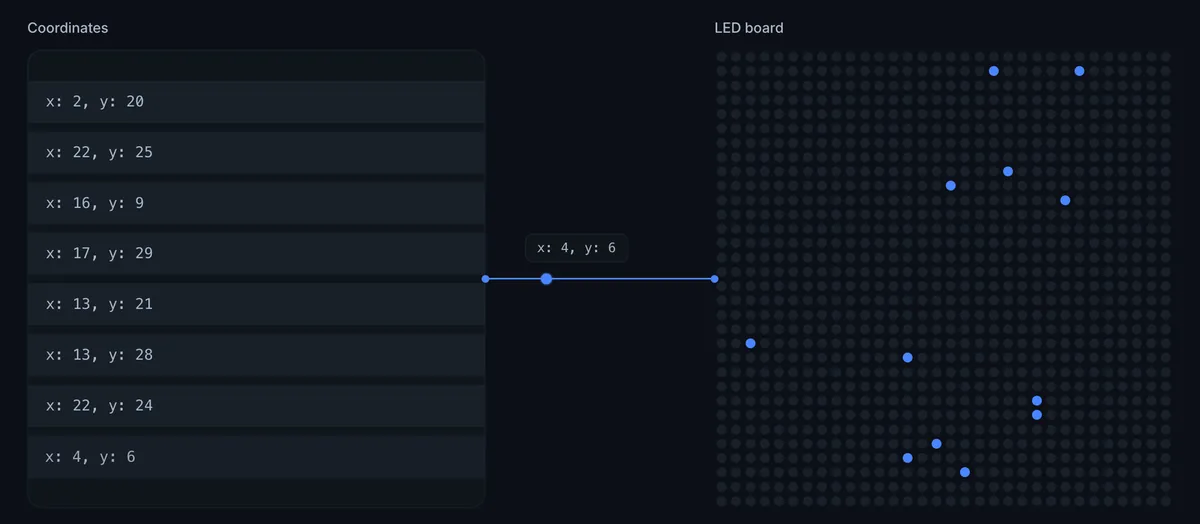
A client sends an instruction to a server, which applies the needed changes to the LED board by turning a specific LED on or off. At first glance, it is no more complex than that, but it already raises several interesting questions about the "how". The idea was simple: draw on this board from my phone, from anywhere, and see it light up at home in real time. Let's start by giving it a name.
Remote procedure call
It was only after finishing this whole little project that I learned the way my computers communicated had a name. In fact, it is even a well-documented technique that has been around for a long time. It is called RPC, short for Remote Procedure Call.
RPC is an abstraction layer on top of the network that lets one program call a function executed by another program, as if the call were local. We write a normal function call, and we do not have to deal with the details of the remote interaction.
As you can imagine, there are a lot of RPC libraries that simplify the implementation of remote procedure calls. For my LED board project, I didn't use one. As usual, I created my own from scratch, to discover the ins and outs. This is always the best way for me to learn! So let's see how we can set up this communication between the client and the server in practical terms.
Building from scratch
Message interface
First, we need to define the message that will be exchanged between the client and the server. It contains a unique id, a method name, and the parameters params to pass to the method. This is intentionally the minimal interface.
{
    id: "a1",
    method: "turnOn",
    params: [10, 24, "red"]
}
Choosing a transport
Then, we need to decide how to communicate between machines over the network. RPC can run over different transports: HTTP or WebSocket in the browser, stdio, IPC, TCP outside of it… The choice depends on the environment and the requirements of the application.
Here, we will use the  WebSocket API, which opens a persistent, bidirectional channel between the two machines. This choice implies that we identify each message with a unique
id. Indeed, with fetch, each response comes back attached to its request. But with WebSocket, there is no such pairing: messages simply flow in both directions. If we send two calls in a row, nothing tells us which answer belongs to which call, and they may even come back in a different order. This is what the id is for, pairing each call with its own response.
(note that for a simple call and its response, HTTP would be enough. But we will soon need the server to speak first, and this is where WebSocket becomes necessary.)
On the server side
On the server side, we need to set up a registry of all the functions that the client is allowed to ask the server to execute.
// Where we keep the LED states
const leds = new Map()

// Registry of functions that the server can execute
const registry = {
  turnOn: (x, y, color) => {
    leds.set(`${x}:${y}`, color)
    return [...leds]
  },
  turnOff: (x, y) => {
    leds.delete(`${x}:${y}`)
    return [...leds]
  }
}

// Listen for incoming messages
// Execute the registered function
// Return the state to the client
ws.on("message", ({ id, method, params }) => {
  const result = registry[method](...params)
  ws.send({ id, result })
})
registry is like a dictionary for the server. It knows that somebody can ask it to call turnOn and turnOff, and it will execute the corresponding function. The server is ready to receive requests. Let's move to the client side.
On the client side
From the client, we want to send a message to our server like "Turn on this LED". The client keeps a pending promise under the message id, and resolves it when the matching response arrives. This is what we can observe below:
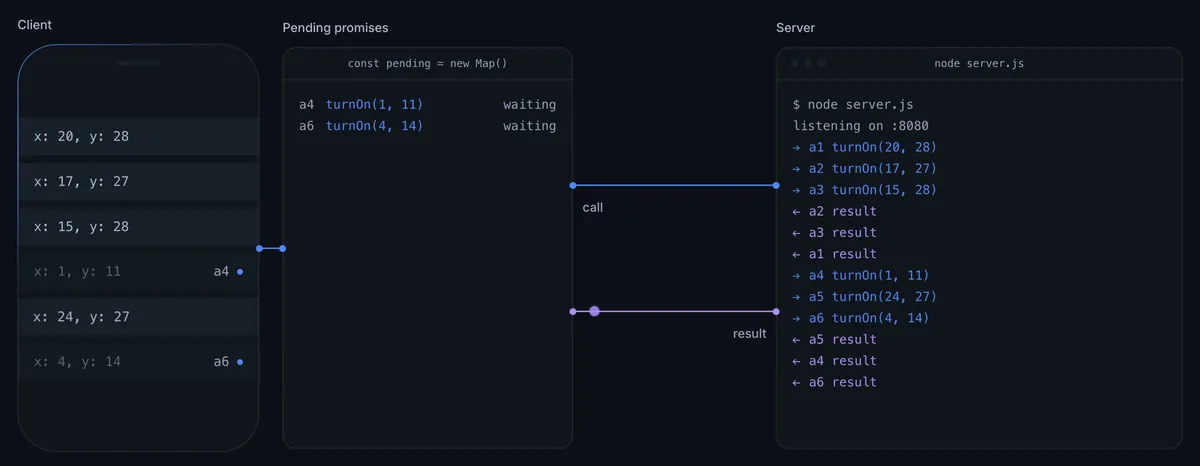
Given the random order in which responses arrive, it now seems obvious that we need this pending map to reconcile each call with its corresponding response. Take a look at this naive implementation:
// Keeping the pending promises
const pending = new Map()

// Call a remote procedure and return a promise
const call = (method, params) =>
  new Promise((resolve) => {
    const id = generateId()
    pending.set(id, resolve)
    ws.send({ id, method, params })
  })

// Listen for results from the server via WebSocket
// Resolve the corresponding promises
// Remove the pending request id
ws.addEventListener("message", (e) => {
  const { id, result } = JSON.parse(e.data)
  const resolve = pending.get(id)
  resolve(result)
  pending.delete(id)
})
Everything is ready to send our first request to the server. We wrap call in a board object that mirrors the server registry, so the request looks like a local function call.
// Client-side mirror of the registry
// It could be a proxy to avoid listing all the methods manually
const board = {
  turnOn: (...params) => call("turnOn", params),
  turnOff: (...params) => call("turnOff", params)
}

board.turnOn(10, 24, "red").then((result) => {
  console.log(`turnOn has been executed on the server!`)
  console.log(`The up-to-date leds state is:`, result)
})
No URL, no HTTP verb, no route… We only call a function with its arguments! And now we have a minimal RPC implementation! The whole process can be illustrated as follows:
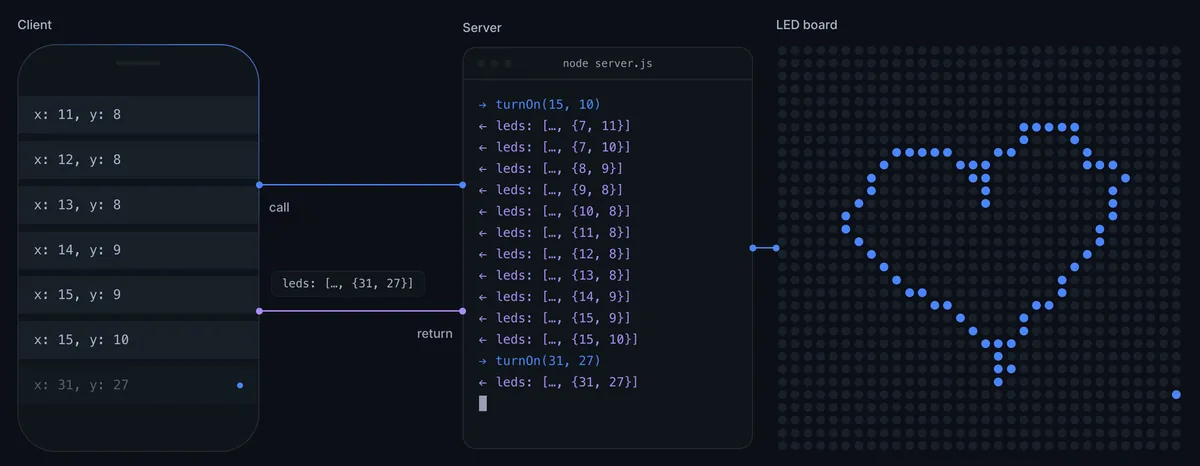
Remember that, unlike a local procedure call, RPC implies that there is network communication between our client and server, which means that a call request can fail: the remote machine can be unreachable or the server can encounter an error while processing the request. The pseudo-code above doesn't handle this common scenario at all. But we definitely should handle these potential errors properly in a real-world implementation.
Now comes the most fun part. We have a state coming back from the server to the client, and we can now reflect this up-to-date state in our front-end.
Remote state and reactivity
Reflecting the server state on the UI sounds easy at this point: turnOn returns the state, we store it, and we render. It works… as long as there is only one client sending requests to the server. Picture the scene: I call turnOn from a client, and the board lights up. Now, someone else opens the same page on another device. Their client didn't call anything, so it receives nothing: my LED is on the board, but not on their screen.
Publishing from the server
The server has to send its state to all the connected clients, not only to the one that made the call:
// The WebSocket server keeps track of all the connected clients
const wss = new WebSocketServer({ port: WS_PORT })

// A new client gets the current state right away
wss.on("connection", (ws) => {
  ws.send({ event: "leds", payload: [...leds] })
})

// Publish an event's payload to all the clients
const publish = (event, payload) =>
  wss.clients.forEach((client) => {
    client.send({ event, payload })
  })

const registry = {
  turnOn: (x, y, color) => {
    leds.set(`${x}:${y}`, color)
    // return [...leds]
    publish("leds", [...leds])
  }
  // same with turnOff
}
An agnostic listener on the client
The client now receives messages it didn't ask for. This is a good time to improve what we have built so far. We will create a createRPC function that knows nothing about LEDs. It is only a message service: call sends one to the server, as before, and a new on registers a callback for an event name. It is the counterpart of publish.
const createRPC = () => {
  const ws = new WebSocket(`ws://localhost:${WS_PORT}`)
  // Keeping the pending promises, by call ID
  const pending = new Map()
  // Keeping the registered callbacks, by event name
  const listeners = new Map()

  ws.addEventListener("message", (e) => {
    const msg = JSON.parse(e.data)
    // An event: notify every callback registered under its name
    if (msg.event) {
      return listeners.get(msg.event)?.forEach((cb) => cb(msg.payload))
    }
    // A response: resolve the pending call, as before
    pending.get(msg.id)(msg.result)
    pending.delete(msg.id)
  })

  return {
    call: (method, params) => {
      // same as before
    },
    on: (event, cb) => {
      // the pub-sub pattern
      if (!listeners.has(event)) listeners.set(event, new Set())
      listeners.get(event).add(cb)
    }
  }
}
The model
On top of it, we can build a model. This is the only place on the client where the LEDs exist along with their methods and states. Here we will use  preact signals to keep reactivity between state and UI.
const ledsModel = (rpc) => {
  const leds = signal([])
  // The signal is updated each time the server sends a new state
  rpc.on("leds", (value) => (leds.value = value))
  return {
    leds,
    turnOn: (...params) => rpc.call("turnOn", params),
    turnOff: (...params) => rpc.call("turnOff", params)
  }
}
Look at what a component sees now: we can consume the server state as needed, without worrying about how it's managed under the hood.
// Create the RPC and the model
const rpc = createRPC()
const board = ledsModel(rpc)

// Consume the board leds state as needed
const App = () => {
  const turnOnRandomLed = () => {
    board.turnOn(randX, randY, "blue")
  }

  return (
    <div onClick={turnOnRandomLed}>
      {board.leds.value.map(([key, color]) => {
        //...
      })}
    </div>
  )
}
No promise to await, no response to apply, no WebSocket in sight. The component calls a method and reads a value, as it would with a local store. RPC hides the network behind a function. The model hides it behind an object, with its methods and its state. And the bonus is that createRPC is agnostic: we can plug any new model into it. Et voilà!
Try to draw lines on each phone's LED matrix and see what happens now between the server and the multiple clients:
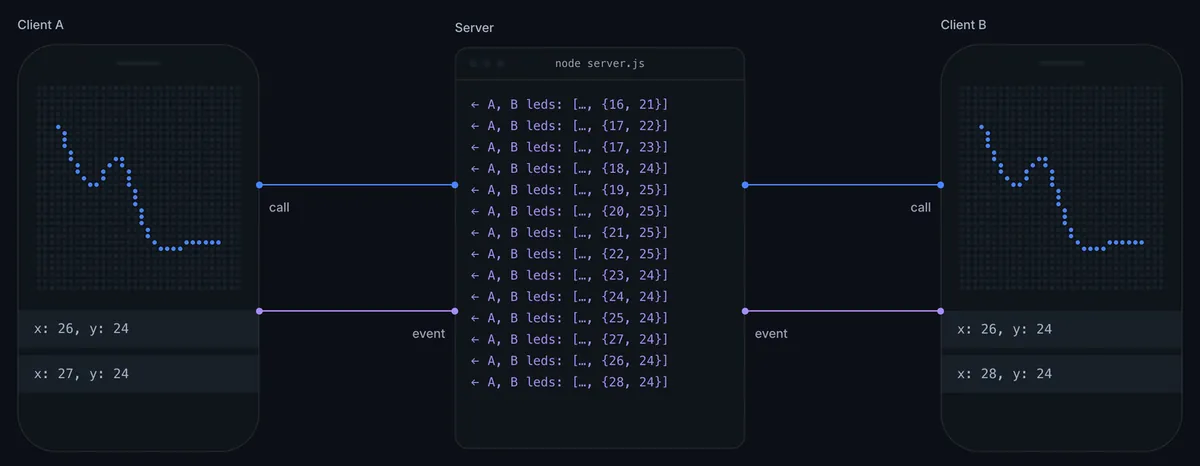
Pretty cool, right? But what was all of this for? Let's go back to my project.
The LED board in action
A simple RPC implementation enables so many fun applications. With only a few lines of code, we can make two computers communicate. And this is what I applied to my LED board project. You know what? You can try it yourself, in my own living room!

What a pleasure it is to see my actions reflected instantly on a remote device, as if both machines were one. I drew with my finger on my phone screen, miles away from home, and my drawing was displayed in real time on the LED board sitting on the living room shelf, right before my son's amazed eyes. This project was initially meant for my nieces and my son, to let them communicate by drawing something on the LED board. And let's just say it made quite an impression.
Conclusion
I didn't invent anything here. I just implemented a well-known technique with my own tools and my own understanding of it. That said, I have to mention by  Jason Miller, which inspired this RPC architecture. The difference is that its models are defined on the server side, and the client gets them automatically.
This article stays at the "discovery" step: what RPC is, and how it can be used in a real project. Many interesting questions remain open. The obvious one I'm not covering at all is:
- What about static typing between the server and the client methods and states? (This is, for example, what
 tRPC solves.)
- What about conflicts if two clients turn on the same LED?
- What if a client loses the connection? How to get back the last up-to-date state?
- What about the network security?
I did not want to expand further, the idea being to focus on what is possible to do with this paradigm more than on technique. But a use in production will probably require asking all these questions!
As usual, the full implementation is available in this repository, and it goes a bit further than the pseudo-code shown here.
I greatly enjoyed writing this article and building interactive modules for it. If you learned something new or enjoyed reading it, consider  supporting my work ☕️ or feel free to connect with me on Bluesky or
 LinkedIn 👋
Sources
Articles
 A Critique of the Remote Procedure Call Paradigm, Tanenbaum & van Renesse, 1988
 Bridging the Server-Client Boundary with Signals, Jovi De Croock
 Cap'n Web: a new RPC system for browsers and web servers, Kenton Varda and Steve Faulkner
 Rebuilding gRPC from First Principles, Sahil Sarwar
 Why you (probably) don't need a REST API, Melvin Fengels
Libraries